
Mini quiche bites seem simple, but they’re surprisingly forgiving and endlessly customizable. I always find myself returning to this recipe when I want something savory that feels fancy but is really just a handful of ingredients. They’re a hit at brunches, potlucks, or when I want a snack that’s filling but not heavy. Plus, they’re a great way to use up odds and ends in the fridge without fuss.
Why I Keep Coming Back to This Recipe
They’re forgiving, versatile, and always a crowd-pleaser. I love the freedom to experiment—adding different cheeses, herbs, or meats keeps it fresh. Plus, they’re quick, satisfying, and just fancy enough to elevate any meal. Every batch reminds me how a simple idea can turn into something special, especially when I want something easy but impressive.
Ingredients Breakdown & Variations
- Eggs: The base—rich and binding. Swap for a flaxseed mixture for vegan bites.
- Cream or milk: Adds richness and creaminess. Use almond milk for dairy-free.
- Pastry or tart shell: Crust that holds everything together. Crackers or bread crumbs work in a pinch.
- Cheese: Gives flavor and gooey texture. Switch to goat cheese for tang or skip for dairy-free.
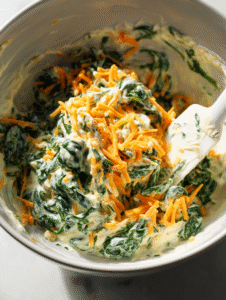
- Fillings (ham, herbs, veggies): Customize endlessly. Use spinach, sun-dried tomatoes, or leftover roasted veggies.
- Salt & pepper: Essential seasoning. Adjust to taste, add a pinch of smoked paprika for depth.
- Herbs and spices: Fresh or dried—they elevate the flavor. Chives, parsley, or thyme work well.
Tools & Equipment for Perfect Mini Quiche Bites
- Mini muffin tin: Shapes and bakes the individual bites evenly.
- Whisk: Blends eggs and cream smoothly.
- Pastry cutter or glass: Cuts pastry into circles to fit muffin cups.
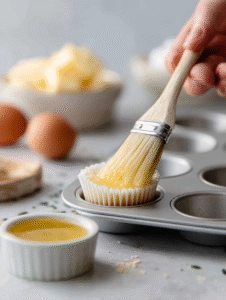
- Pastry brush (optional): Greases muffin tin for easy removal.
- Oven thermometer (if needed): Ensures oven temperature accuracy.
Crafting the Perfect Mini Quiche Bites: Step-by-Step
Step 1: Preheat your oven to 180°C (350°F).
Step 2: Grease a mini muffin tin with butter or non-stick spray.
Step 3: In a bowl, whisk together eggs, cream, and a pinch of salt.
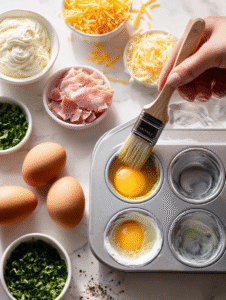
Step 4: Chop your chosen fillings—think sharp cheddar, smoky ham, or bright herbs.
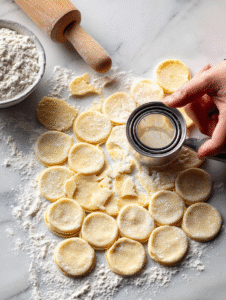
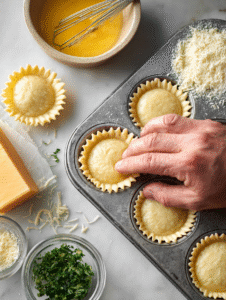
Step 5: Press small circles of pastry into each muffin cup, about 1 inch diameter.
Step 6: Pour the egg mixture into each pastry shell, filling about ¾ full.
Step 7: Bake for 15–20 minutes until the tops are puffed and golden.
Step 8: Allow to cool slightly before removing from the tin.
Cooking Checkpoints & Tips for Mini Quiche Bites
- The pastry edges should be golden and crisp, not pale.
- Egg filling should jiggle slightly in the center but set on the edges.
- Use a toothpick or small knife to check for doneness—no runny egg should remain.
- If the tops brown too fast, loosely cover with foil and continue baking.
Common Mistakes & How to Fix Them
- Baking without preheating.? FORGOT to preheat oven? Crust may turn out pale. Fix: Preheat for at least 10 minutes before baking.
- Overfilling muffin cups.? DUMPED too much filling? Bites spill over. Fix: Fill only ¾ full for neat, puffed tops.
- Baking at too high heat.? OVERTORCHED the tops? They’re dark and dry. Fix: Cover loosely with foil halfway through baking.
- Relying solely on time.? NOT checking for doneness? Might be undercooked. Fix: Use a toothpick; it should come out clean.

Mini Quiche Bites
Ingredients
Equipment
Method
- Preheat your oven to 180°C (350°F) and lightly grease your mini muffin tin with butter or non-stick spray.
- Roll out the puff pastry on a lightly floured surface and cut out small circles about 1 inch in diameter, using a pastry cutter or glass.
- Press each pastry circle gently into the cups of the muffin tin, ensuring they cover the bottom and sides evenly.
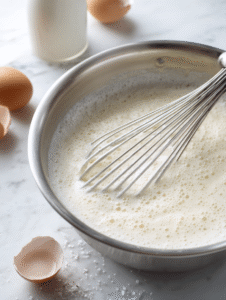
- In a bowl, whisk together the eggs, cream, salt, and pepper until smooth and slightly frothy, filling the entire bowl with a fragrant aroma.
- Chop your fillings—cheese, ham, and herbs—and sprinkle a small amount into each pastry shell.
- Pour the egg mixture into each pastry shell, filling about ¾ full, so they don’t spill over during baking.
- Bake in the preheated oven for 15–20 minutes, or until the tops are puffed up and golden brown with a slight crispness around the edges, and the filling is set.

- Remove from the oven and let the bites cool for a few minutes before gently removing them from the tin, revealing tender, flaky crusts and creamy filling.

- Serve warm or at room temperature, enjoying the crisp pastry and savory, custardy filling in each bite.


Hi, I’m Clara Sage – and welcome to my kitchen of small revelations.
I created The Language of Aha not just as a recipe blog—but as a space to celebrate the little lightbulb moments that happen in the kitchen.